Saturday, November 30, 2013

Make Recycled Gift Tags From Old Holiday Cards


When I first got married, we did  not have a lot of money for the little things, like tags for presents. My husband's grandmother, Grandma Fuller, taught me how to make pretty Christmas gift tags, using old cards that had been mailed the year before! This is a very easy and cheap way to finish off your presents. In my opinion, they look a bit more personal than the store bought tags! 

Materials Used:
Old holiday cards
Scissors or paper cutter
Hole punch (optional)
Marker or Pen, for labeling


Step 1: Collect Card Covers


Gather up your collection of old holiday cards, and either cut or tear the covers off, along the crease. You can usually get 4 good size tags from one card cover! 

Step 2: Cut & Punch


Cut your Tags! 
This is where making the decision to use scissors or a paper cutter is crucial...if you cannot cut straight lines (like me!) you may want to use a paper cutter. Or you can have slightly wonky ones, like I do, and call them "rustic". Large cards that have a scene that would not look quite right cut into two tags, can become a folded gift tag! (See picture below).


Step 3: Write & Ribbon


Use a pen or marker (I chose red marker so it would be easy to read) and address your tag. Attach the tag to your gift with ribbon or tape. I  use fabric gift bags that have ribbon attached, so this was really easy.

You can omit punching a hole in the corner and just tape the corner to the gift, just make sure to make the cards large enough to flip. 


Creative Commons License
This work by Little Mom on the Prairie is licensed under a Creative Commons Attribution-NonCommercial-NoDerivs 3.0 Unported License.

Saturday, November 16, 2013

Classic Whole Berry Cranberry Sauce Recipe


Whether you serve them with your stuffing, dessert, or it has its own special place on your table, cranberries add a classic touch to your holiday spread. Make your own homemade cranberry sauce this year for Thanksgiving using fresh cranberries! This easy recipe is so simple yet yields amazing results. I am a bit of a purist when it comes to "the sauce", I don't care for extras like nuts or orange zest. A lot of the people sharing the table with me won't even touch a cranberry, but they certainly won't eat one that tastes like oranges! So I am sharing with you my simple standby, a 4 ingredient classic cranberry sauce recipe.


If you LOVE the smooth jellied version, you can check out my tutorial to make your own! Can ridges optional! I like to let mine set in a well-washed can, to add those little ridges. It's a fun way to give everyone the cranberry sauce they expect, with great homemade taste.


Homemade jellied cranberry sauce, complete with can ridges! 

You will need:

1 (12 oz.) pkg. whole cranberries

1/2 cup water

1/2 cup apple juice, unsweetened if possible

1 1/2 cup sugar

Directions:

1. Combine water, apple juice and sugar in a medium sized sauce pan and bring to a boil. Add your rinsed cranberries and bring it back up to a boil (the cranberries will initially bring down your overall temperature, requiring that we bring it back to a boil). 

 
Medium-low flame 

2. Reduce heat to med-low (as shown) and simmer for 10-15 minutes, stirring occasionally. 


Berries cooking, none have burst yet 

3. Remove from heat. 

The next part is optional: 


I like to mush up some of the berries with a potato masher at this point, or you can remove half the cranberry mixture and blend it until the consistency you desire. Many of the berries burst during the simmering process, but I like to have a nice mix of berry bits and smooth, silky sauce. 

4. Cover and refrigerate until serving. I think it gels better if you make it the day before, but you should at least wait a few hours with it in the fridge before serving. 

This tastes great with real vanilla bean ice cream! 


Also is great used on leftover turkey sandwiches! 

Creative Commons License
This work by Little Mom on the Prairie is licensed under a Creative Commons Attribution-NonCommercial-NoDerivs 3.0 Unported License.

Thursday, October 31, 2013

10 Trick Or Treat Safety Tips


Keeping safety in mind, children can go gather their parents free candy trick or treat to their hearts' content! 


1. Parents should inspect treats and throw away anything unwrapped or loosely wrapped - including anything homemade from someone parents don't know. Check for signs of tampering or small holes.


2. Watch out for choking hazards for little ones, such as gum, peanuts or hard candy.

3. Tripping is a concern, so make sure costumes are not too long, baggy or loose. 

4. Costumes should be bright, reflective and flame retardant. Face masks need to fit well so that children's vision and hearing is not impaired.

5. Feed children before you trick or treat. When they're hungry, they could be tempted to sample the treats.

6. Children younger than 12 need parental supervision. THIS IS LAW in many places, including Illinois. 

7. Remind children to walk from house to house and not to walk in yards, where they could trip.

8. Flashlights with new batteries should be used as they walk on the sidewalks.

9. Driveways and alleyways are dangerous areas and need to be approached cautiously. If you're driving trick-or-treaters, have them exit your car on the curb side. Most importantly, stay off your cellphone while driving to avoid the distraction, the Illinois State Police urge.

10. If you're on candy duty at home, make sure your walkway and yard are clear in anticipation of kids coming to the door. Keep dogs and other animals inside and away from the door. Also keep jack-o-lanterns with candles out of the way.

BE SAFE AND HAVE A 
HAPPY HALLOWEEN!

Creative Commons License
This work by Little Mom on the Prairie is licensed under a Creative Commons Attribution-NonCommercial-NoDerivs 3.0 Unported License.

Wednesday, October 30, 2013

How to Inspect Halloween Candy Properly

Make sure to thoroughly inspect your free candy your kids' candy before they (and you) dig in!

Parents should inspect treats and throw away anything unwrapped or loosely wrapped - including anything homemade from someone parents don't know. Check for signs of tampering or small holes.


How to Inspect Candy for Trick or Treating Safety -- powered by ehow


BE SAFE and Have a Happy Halloween!


Creative Commons License
This work by Little Mom on the Prairie is licensed under a Creative Commons Attribution-NonCommercial-NoDerivs 3.0 Unported License.

Saturday, June 8, 2013

10 Things to do with Kids This Summer ~ FREE!

These days, "fun" and "free" don't seem to meet up enough. But there are plenty of ways to have fun with your kids this summer, without having to spend a lot of cash! You just have to get creative. the key is to make ordinary things more fun! Like my first item on the list...

Beat the Summer Time Blues with Free Fun Activities!


1. Have a picnic! 
You have to eat anyway, so why not make it fun? You don't have to invest in one of those cool picnic sets to have a blast (even though they are pretty cool). Make some sandwiches, grab some chips and juice and head to your back yard or local park. Or you could even grab take out and go to a park, the idea is the same and you get to eat while taking in the scenery. Plus the kids can work off some energy before you head home! Bonus!

2. Expand their horizons...for free!
Many cities have free concerts in the park, some even have free (or cheap) movies in the park. We have seen several free plays by local colleges. Check your local paper or go to About.com's local site for your area to find these events near you. Invite friends and it becomes a party (that you don't have to host). Many of these are evening events, so they won't cut into work time. You can bring your own snacks, too. 

3. Educational fun
Most museums have free or deeply discounted days during the summer. Often it's on a regular basis, like the first Tuesday of the month, but sometimes it's just a once a year event. Go to the websites of attractions in your area and search using the keyword "free" and see what come up. Make a list of what's free and when in your area and refer to it often.

4. Learn to Skate
There are dozens of roller skating rinks nationwide that participate in the Kids Skate Free program—which is just as it sounds: a way for children to skate, and therefore get some good exercise, for free this summer. Visit the Kids Skate Free website to find a participating rink near you. You’ll find rinks in 30 states.

5. Take up Bowling
There are dozens of roller skating rinks nationwide that participate in the Kids Bowl Free program ~ if you sign your kids up at the Kids Bowl Free website, that’s exactly what you’ll get. Some bowling alleys have free or cheap shoe rentals as well. 

6. Earn Free Books & Prizes
A great free activity for summer has always been free summer reading programs at your local public library. This summer, your young reader can participate in Barnes & Noble’s own version of a free reading program, and earn a free book in return. All the details, including a book log to use, are on the Barnes & Noble website
This summer, my daughter completed the reading programs at both our library and B&N, she earned 4 free books and a few fun trinkets, like a bracelet, bookmarks, and a reading pillow.  She loves getting in on freebies, and loves books!

7. Camp out
Either use a tent you already have, borrow one, or make one out of blankets - it doesn't need to be fancy to be fun! You can even roast marshmallows over a little hibachi grill, tell stories, or play games. Plus, if you need the bathroom or the weather takes a turn, you can run indoors. This is great for most age groups. 

8. Have a scavenger hunt
This is something that can also be modified by age group. Clues and hiding spots can be made more difficult for school age kids, or they can help younger siblings complete the list! Make it fun, going through the house and the yard.

9. Grow a Garden
Check with your neighbors, or your local Craigslist "free" listings, for free plants and gardening supplies. My daughter and I have a little container garden that we put together from peoples' leftovers, and it has given us a fun thing to do together every day.

10. Build a back yard water obstacle course
Another idea that can be changed depending on the age of your kids. Use (safe) items from around the house to mark off a course, with fun tasks. Borrow things from neighbors and invite their kids to join in, too! Use a wading pool, lawn chairs, laundry baskets etc as obstacles. Make it more fun by adding sprinklers to run through, or have them carry a full water balloon through the course - the idea is to not drop it! The kids who make it through with an intact balloon get a prize - getting shot by the adults with the hose!

Creative Commons License
This work by Little Mom on the Prairie is licensed under a Creative Commons Attribution-NonCommercial-NoDerivs 3.0 Unported License.

Saturday, May 4, 2013

Organic Pest Control Remedies

MILK
Milk is effective against a range of mildews on peas, pumpkins and cucumber leaves. Use equal parts milk and water and spray every couple of days until the mildew is under control. If the mildew is out of control remove the affected leaves to avoid the mildew from spreading and do not water at night, try watering in the mornings.


MOLASSES SPRAY
Molasses is a good deterrent sticky spray, ideal for cabbage moths and grubs. Blend 1 tablespoon of molasses with 1 liter of hot water until the color of weak tea, then mix in one tea spoon of detergent, which will help the molasses to stick to the leaves, spray top and under side of the leaves. You could also add vinegar to this brew to make it more potent.


VINEGAR SPRAY
For cabbage moths and grubs. Blend 1/4 vinegar with 3/4 of water, then mix in one tea spoon of detergent, which will help the vinegar to stick to the grubs, bugs and leaves of the plant, spray top and under side of the leaves. You can also add molasses to this brew.


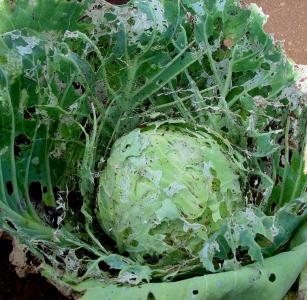
Severe damage done by a cabbage moth. 


CHAMOMILE TEA
Is a mild fungicide. Pour boiling water over a chamomile tea bag, leave to steep for ten minutes, when cool use as a spray.


VEGETABLE OIL
Spray recipe: Mix 1 tbsp of liquid soap with 1 cup of vegetable oil. Dilute as required using 1-2.5 tsp of the mixture to 1 cup of water. Oil sprays can cause burning when applied to sensitive plants. If in doubt, test a plant sample first and wait 2-3 days to see if burning results. Oil sprays can also cause burning if applied when shade temperatures exceed 29 degrees Celsius or when applied within 4 weeks of a sulfur spray such as wettable sulfur or lime sulfur. 


PURE SOAP
Pure soap when mixed with water can be used as a natural insecticide for the control of some sap-sucking insect pests, including aphids and mealy bugs. It is a contact insecticide and works by breaking down the insect’s exoskeleton, causing it to dehydrate and die.


CURE FOR WHITE/BLACK SPOT (mildew)
Add *1 liter of FULL fat milk to an *8 liter watering can, watered on Roses or mildew attracting plants, will kill white/black spots.  


SCALES
Make the oil spray by blending two cups of vegetable oil with one cup of pure liquid soap, and mix it until it turns white.
Dilute one tablespoon of the emulsion to one liter of water and spray all affected areas thoroughly. Do this during mild weather, because if it’s hot it may burn the plant’s leaves.
Scales shoot a sweet substance called honeydew. Ants literally farm the scale to feed on the honeydew. They’ll pick them up and they’ll move them all over the tree. Honeydew also leads to sooty mold, a black dusty fungus that grows over the leaves and stems. Controlling the scale will also get rid of the sooty mold.


To keep APHIDS and OTHER PESTS off your Roses: Finely chop 1 onion and 2 medium cloves of garlic. Put ingredients into a blender with 2 cups of water and blend on high. Strain out pulp. Pour liquid into spray bottle. Spray a fine mist on rose bushes, making sure to coat both tops and bottoms of leaves.


GENERAL PESTICIDE
3 hot green peppers (canned or fresh) 2 or 3 cloves garlic 3/4 tsp liquid soap 3 cups water Puree the peppers and garlic cloves in a blender. Pour into a spray bottle and add the liquid soap and water. Let stand 24 hours. Strain out pulp and spray onto infested plants, making sure to coat both tops and bottoms of leaves.


ORGANIC BUG SPRAY FROM ONION SCRAPS
You can make your own organic bug spray from kitchen leftovers! Simply save your onion skins, peels and ends then refrigerate in an empty margarine-sized tub or ziplock bag until the container is full. Once you have enough, place the onion pieces in a pail and fill with warm water. Soak for a few days, up to a week. You can keep this on the patio in the sun to steep but this is optional. After one week, strain the onion bits out and store the onion water in spray bottles.


Photo Credit: Australian Organic Gardening


AGAINST INSECT PESTS
1. Soapy water (NOT detergent). Try to find one based on caustic potash, rather than caustic soda and mix well with water until frothy (you’ll need more soap in hard water areas). For aphids and other soft-shelled insects
2. Oil sprays suffocate insects. Boil 1 kg soap with 8L of oil, stirring until dissolved. Dilute 1:20 with water just before use. Spray on cool days only.
3. Tomato leaf spray (very poisonous). Cover leaves with water, boil and cool. Use immediately as a general insecticide.
4. Wormwood spray. Infuse leaves in boiling water and leave for a few hours. Dilute 1:4 and use for sap-sucking insects.
5. Chilli spray – equal volumes chilli and water blended and sprayed fresh onto caterpillars. (Prevent contact with eyes and skin.)
6. Lapsang Souchong tea – a strong brew (1 tbsp in a pot) deters possums from nipping rose tips.


Creative Commons License
This work by Little Mom on the Prairie is licensed under a Creative Commons Attribution-NonCommercial-NoDerivs 3.0 Unported License.

Wednesday, May 1, 2013

Great Gardening Freebies

1. You can get free seeds by sending a SASE to Winterstown and they will send you a 6 pack of free seeds, along with information on how to save your own seeds for next year's garden!  Click here to get the info and get your seeds!

2. Marigold's Loft is offering free square foot gardening planner printables! These come in handy even if you aren't into square foot gardening, just to have a printable planner on hand. Click here to go to her page and print it out! 


3. There is a free visual garden planner available at BHG.com. You can choose the plants and set it up, and see what it will look like - very nice for flower gardens! 

4. You can sign up for more than 10 free gardening catalogs! I love to window shop for gardening stuff more than anything else, I think! 

Free Annies Annuals Catalog
© Annie's Annuals and Perennials


Creative Commons License
This work by Little Mom on the Prairie is licensed under a Creative Commons Attribution-NonCommercial-NoDerivs 3.0 Unported License.