Showing posts with label cupcakes. Show all posts

Saturday, August 25, 2012

Easy Mini Crescent Roll Quiches


I've done a post about quiche before...it is one of my favorite meals, and it reminds me of my childhood, standing in the kitchen cooking with my dad. We are very French, so it feels good to share this meal with my family, in any form! You can make these babies ahead of time and freeze them, they will keep in a Tupperware or a Ziploc baggie for about 3 months. IF they last that long! 


Ingredients:
10 slices bacon
1 8-ounce package cream cheese, softened

1 cup shredded cheddar cheese
2 tablespoons milk
3 eggs
2 tablespoon dried flaked onion
1 Tbsp  Roasted Garlic & Bell Pepper Seasoning  by McCormick (One of my personal favs!)
1 sprinkle of salt, pepper (to taste)
2 cans Pillsbury refrigerated crescent rolls 


Directions:

1. Heat oven to 375 degrees (F). Lightly grease muffin cups. (I used a spritz of Pam.)

2. Cook bacon over medium high heat until crisp and evenly brown. Drain, crumble, and set aside.

3. Beat the cream cheese, milk, and eggs in a medium bowl until smooth, with an electric mixer on low. Stir in cheddar cheese, onion, garlic, and seasoning, and set aside.

4. Separate each crescent triangle. Press each one into the bottom and sides of each muffin cup. Sprinkle bacon evenly into the bottoms of the dough-lined muffin cups. Spoon cheese-egg mixture into each cup, but do not overfill. I would say just leave a little from the brim, to allow for the egg to puff up.

5. Sprinkle reserved bacon and a little shredded cheese on top of each, if you like.

6. Bake 10-15 minutes, until filling is set and rims of the quiches are golden brown. If you tap a quiche and it bounces just a little under your finger, it is perfectly cooked.

Makes 24 mini quiches. 

To see step by step instructions with pictures, head over to instructables.com! If you like what you see, vote for me!


Happy Baking!


Creative Commons License
This work by Little Mom on the Prairie is licensed under a Creative Commons Attribution-NonCommercial-NoDerivs 3.0 Unported License.

Saturday, May 26, 2012

Dad's Hearty Breakfast Muffin-Cakes

I make these muffins/cupcakes (they work well either way) for the boys, to start their day out right. It starts with a cake mix, because I am both creative and lazy...
Chock full of cranberries, nuts and apple-y goodness, you can either top it off with just a dab of cream cheese frosting, or smear with a little butter. 


You need: 
1 Box Spice cake mix
1/2 tsp ginger
1/2 tsp cinnamon  
1 1/4 Cup Applesauce, unsweetened
1/2 Cup Vegetable Oil        
3 large eggs
1/2 cup dried cranberries
1/2 cup chopped walnuts
3/4 cup MINI semi-sweet chocolate chips


     Preheat oven to 350 degrees F. Combine cake mix, eggs, oil, and applesauce into a large mixing bowl. Beat on medium speed for 2 minutes. Add in the nuts, chocolate and berries last, and fold them into the batter by hand with a rubber spatula. 


I use silicone re-usable liners, but I like to spritz them with some Baker's Joy, to make sure those lil' beauties pop right out! 


Be careful not to overfill the muffin tins. Like I did, a little. :)
I also had enough batter to make a small loaf of bread. I also tossed a few stray cranberries on top of a few of the muffins. Or cupcakes. I am still not 100% sure what this is, cake or quick bread. But it is darn good with coffee in the morning! 


Bake at 350 degrees F for approx. 22 minutes for the muffin-cakes, or until a toothpick inserted near the center comes out clean. You will need to bake for 35-40 minutes for a loaf or cake pan. Let cool completely before topping with frosting, or smear some butter on top while warm! 


A little powdered sugar goes nicely, too. Or some apple butter. *drools*
These freeze nicely, for making ahead. pop them in the microwave for 30 seconds to a minute, top with something delicious, and head off to start your day! Guaranteed to keep your dad moving. 


Creative Commons License
This work by Little Mom on the Prairie is licensed under a Creative Commons Attribution-NonCommercial-NoDerivs 3.0 Unported License.

Wednesday, April 25, 2012

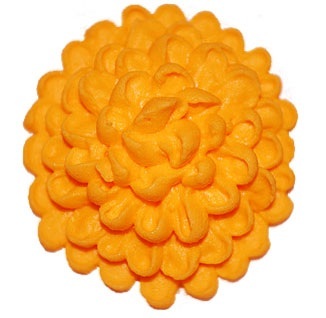
Icing Mums Tutorial

Happy Mother's Day!
These are some of the buttercream icing flowers we made for the Teacher Appreciation luncheon, for the end of the school year. I am looking forward to summer, how about you? The fun yellowy-orange shade of each floret reminds me of a garden bursting into bloom!

Materials:
Tips: #5 and #81 (Master Tip Set)

Icing color: Your choice (I chose a yellowy orange color, I mixed the shade by hand)
Petal Guide: (you can print the one I have posted here in the FULL TUTORIAL)
Prepared Flower Nail (attach wax paper square with petal guide underneath)

Ingredients:
Buttercream icing, medium consistency, in your choice of color.

These are pretty standard items for cake decorators. Don't rush out and buy a cake decorating set unless you honestly and truly plan on decorating a LOT of baked goods.

1- Prepare a bag of buttercream icing with tip #5 and another bag of same buttercream icing color with tip #81.
2- Pipe a small 'mound' of icing with the tip #5 at the center of the flower nail, as indicated by the big orange dot in diagram 2.
3- Insert tip #85 (with the indent facing up) to the bottom edge of mound. Squeeze bag and extend to the edge of inner circle and release pressure pulling slightly upwards at approx. 45 degree angle. Do this in a lower case 't' as indicated in diagram 3.
4- Repeat the petal process as indicated in diagram 4. Then, fill in the gaps with more petals.
To see more steps, Check out the FULL TUTORIAL HERE.
5- Repeat the process for the next layer by piping petals slightly shorter, positioning them between the base petals and on top of the last layer (don't forget to insert the tip slightly into the mound, squeeze the bag, pull and release pressure at approx. 45 degree angle).
6- Repeat the process with 4-5 layers, getting shorter every layer. I usually only do 4 layers.


Let the flower dry, then gently lift off of the waxed paper and add to your cupcake! They can be made big or small, in any color! I love these easy to make little sugar flowers.


Creative Commons License
This work by Little Mom on the Prairie is licensed under a Creative Commons Attribution-NonCommercial-NoDerivs 3.0 Unported License.

Wednesday, February 8, 2012

Chocolate Pudding Cupcakes with Strawberry Centers

Love at first bite
My family was so happy when I made these treats for them, and oh boy do they deserve it! The cold months are always roughest on us financially, and they get a double whammy with V-Day, and my birthday, all in one month.  They have been working extra hours to get me a present, a memory card for my Nook. They deserve cupcakes, and so much more, for how sweet they both are to me!

Ingredients:
1 package cupcake mix, chocolate
1 package strawberries, cleaned and hulled
1 package pudding, chocolate
Fresh mint sprigs,optional but awesome


Directions:
1. Prepare cupcakes according to package and let cool. Using a paring knife, core out a well down into each cupcake, for your strawberry to fit into. Prepare your pudding according to the package.


2. Stick the strawberry pointy side down into your cupcakes. Top liberally with pudding in lieu of frosting.


3.  Add a sprig of mint if you like.  I think it adds a certain something, and my neighbor had some growing in her kitchen and shared…but don’t go out and buy some.


4. I cut each cupcake in half and set it on a plate, because presentation is everything with these suckers. They are DELICIOUS and super easy!


I love you, *DH and *MF  and *GF 
*kisses and hugs galore*    
Now, eat a cupcake!  *shoves a cupcake into two open mouths*


This post was originally on Little Mom Saves Money. These blogs are written by the same person. This is not a copyright violation.
Creative Commons License
This work by Little Mom on the Prairie is licensed under a Creative Commons Attribution-NonCommercial-NoDerivs 3.0 Unported License.