Saturday, April 28, 2012

"Green" Household Cleaner Alternatives (For Cheap!)


Why Make Your Own Cleaners?
There is an ever-growing number of "green" cleaners available on the market, but you have to read the labels closely. Some of them are not quite as 'green' as they would lead you to believe, and until regulation catches up with the eco-friendly market, its uo us, the consumer, to weed out the good from the bad.

In addition to poor regulations and marketing gimmicks, you have to consider your costs. If every cent you spent towards your home is looked at as an investment of sorts, you can get much better performance of your money by making your own cleaning supplies and buying the ingredients wholesale or bulk.Even with coupons and sales, cleaning supplies can really add up over the course of a year.

The costs add up fast
Plus, the health concerns of these chemical based products can be long term, like asthma or allergies. Treatments can be costly, but studies have shown that reducing synthetic chemicals in the home environment lessens symptoms (US National Center for Health Statistics).  I, myself, was told I have mild to moderate asthma a few years ago...with absolutely ZERO family history on either side. I relied on my inhlaer daily, until I started making some simple changes - one of which was the cleaners I use in my home.

Safe Alternatives 
There are many inexpensive, readily available and easy to use alternatives that are much more natural, and can safely be used in substitution of commonly used chemical products.

Soap - unscented soap in liquid form, flakes, powders or bars is biodegradable and will clean just about anything. Avoid using soaps which contain petroleum distillates.

Borax - (sodium borate) cleans, deodorizes, disinfects, softens water, cleans wallpaper, painted walls and floors.

Washing Soda - sodium carbonate decahydrate, a mineral. Washing soda cuts grease, removes stains, softens water, cleans tiles, sinks and tubs. Use care, as washing soda can irritate mucous membranes. Do not use on aluminum.

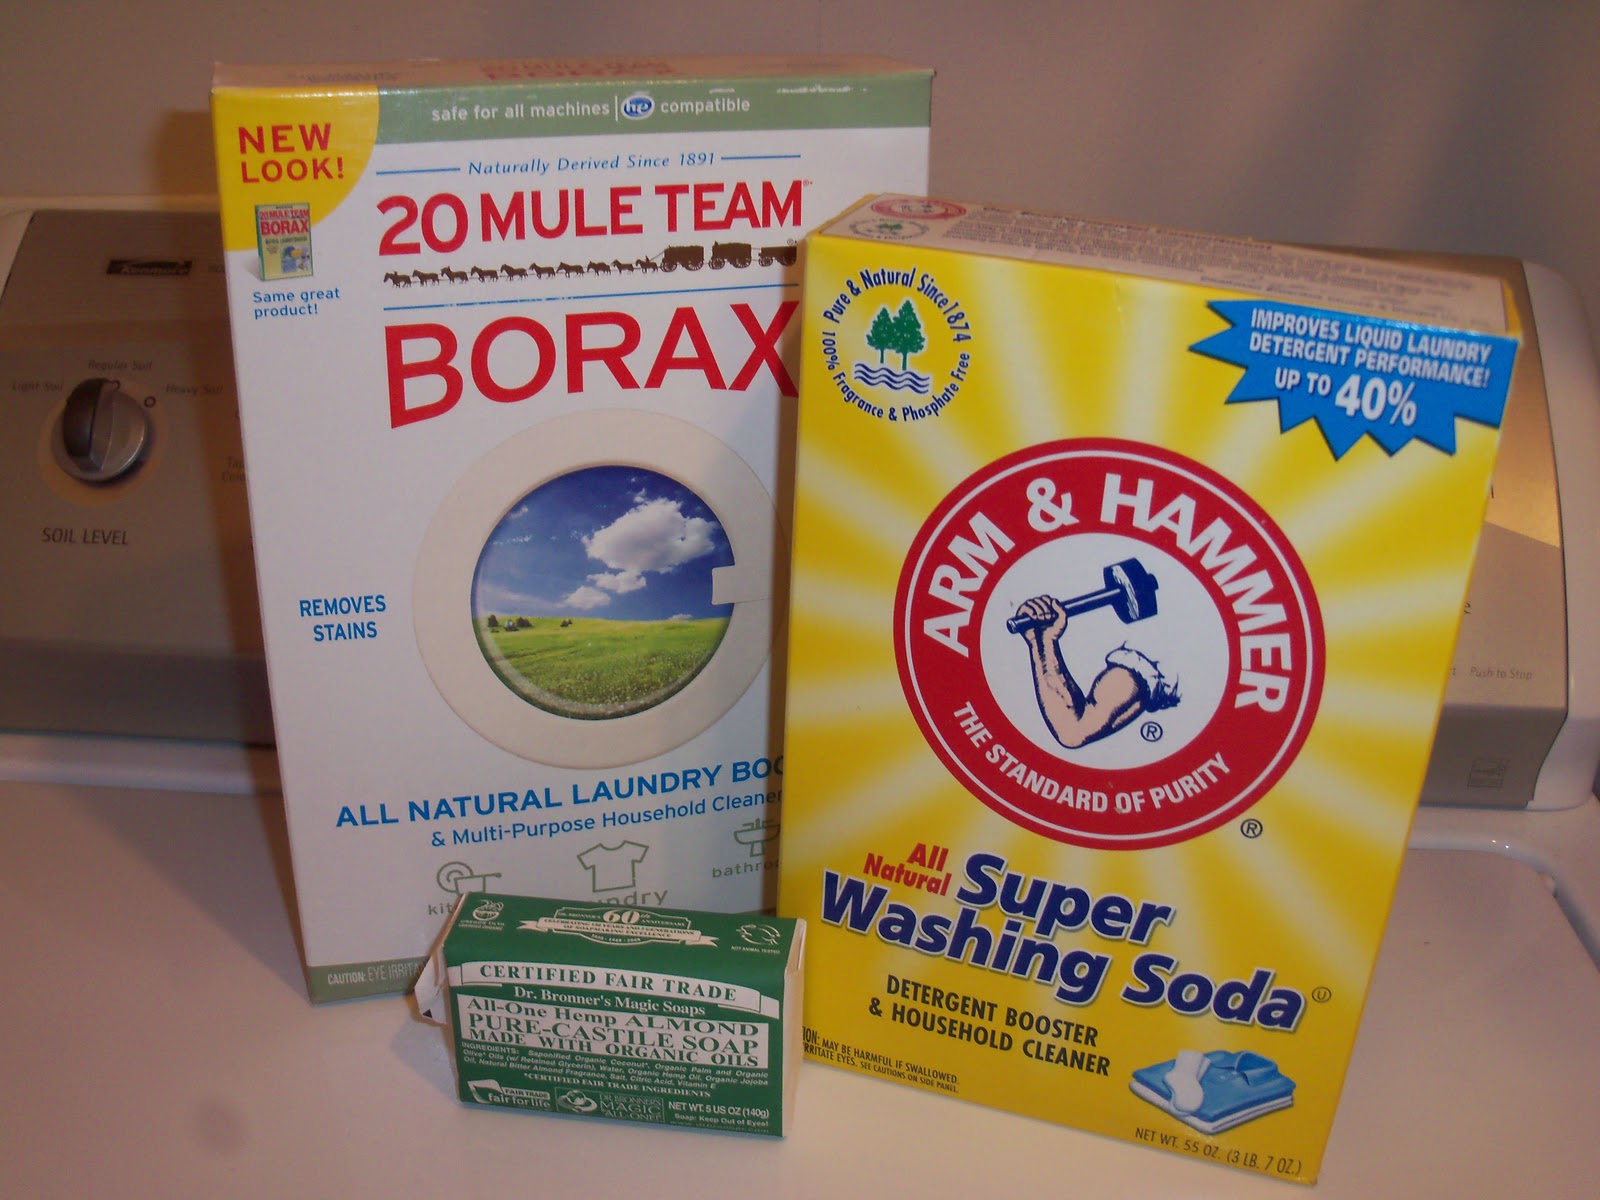
Castile Soap - made from pure oils and comes scented with essential oils or unscented. Use mixed with tea tree oil and water in a spray bottle for a great and 'green' multipurpose cleaner.

Baking Soda - cleans, deodorizes, softens water, scours.

White Vinegar - cuts grease, removes mildew, odors, some stains and wax build-up.

Cornstarch - can be used to clean windows, polish furniture, shampoo carpets and rugs.

Lemon - one of the strongest food-acids, effective against most household bacteria. Citrus can lead to sensitivity with people who are chemically sensitive, so test it out before making a huge batch of citrus cleaners.

Micro-Fiber Cloths - great at picking up dust, dirt & hairs, investing in a set of these can eliminate many of the cleaners and they can last for years.

Another tip commonly overlooked is OPEN the windows to your home now and then. Let fresh air whisk out the bad germs, air out your home and your health (and nose!) will thank you.

Happiness is a Clean, Healthy Home (and $$ Saved!)
In one year, I have saved over $250 by making my own cleaners, AND I only need to get 1-2 inhalers in a year, vs. one per month. I would certainly call that an improvement you can see...which is great, because I am one of those "I need to see it to believe it" kind of gals. :) 

Creative Commons License
This work by Little Mom on the Prairie is licensed under a Creative Commons Attribution-NonCommercial-NoDerivs 3.0 Unported License.

Wednesday, April 25, 2012

Icing Mums Tutorial

Happy Mother's Day!
These are some of the buttercream icing flowers we made for the Teacher Appreciation luncheon, for the end of the school year. I am looking forward to summer, how about you? The fun yellowy-orange shade of each floret reminds me of a garden bursting into bloom!

Materials:
Tips: #5 and #81 (Master Tip Set)

Icing color: Your choice (I chose a yellowy orange color, I mixed the shade by hand)
Petal Guide: (you can print the one I have posted here in the FULL TUTORIAL)
Prepared Flower Nail (attach wax paper square with petal guide underneath)

Ingredients:
Buttercream icing, medium consistency, in your choice of color.

These are pretty standard items for cake decorators. Don't rush out and buy a cake decorating set unless you honestly and truly plan on decorating a LOT of baked goods.

1- Prepare a bag of buttercream icing with tip #5 and another bag of same buttercream icing color with tip #81.
2- Pipe a small 'mound' of icing with the tip #5 at the center of the flower nail, as indicated by the big orange dot in diagram 2.
3- Insert tip #85 (with the indent facing up) to the bottom edge of mound. Squeeze bag and extend to the edge of inner circle and release pressure pulling slightly upwards at approx. 45 degree angle. Do this in a lower case 't' as indicated in diagram 3.
4- Repeat the petal process as indicated in diagram 4. Then, fill in the gaps with more petals.
To see more steps, Check out the FULL TUTORIAL HERE.
5- Repeat the process for the next layer by piping petals slightly shorter, positioning them between the base petals and on top of the last layer (don't forget to insert the tip slightly into the mound, squeeze the bag, pull and release pressure at approx. 45 degree angle).
6- Repeat the process with 4-5 layers, getting shorter every layer. I usually only do 4 layers.


Let the flower dry, then gently lift off of the waxed paper and add to your cupcake! They can be made big or small, in any color! I love these easy to make little sugar flowers.


Creative Commons License
This work by Little Mom on the Prairie is licensed under a Creative Commons Attribution-NonCommercial-NoDerivs 3.0 Unported License.

Saturday, April 21, 2012

Type Case Printer Drawer Spice Rack


I needed to use up the last few printer drawers that we had found in the house... my husband has been eying the corner where they sit and sighing a lot. ( I do mean a LOT.) Plus, my spices were just lined up all over the counter, taking up space.
I rub-stained it this neat retro green color, did a quick clear (spray) coat to seal it, and added picture hangers to the back. It also looks cute propped against the wall on the counter!

 I big puffy heart printer drawers and their versatility! 
Materials Used:
Vintage Printer Drawer, sitting in my corner being clutter
Leftover green stain, also being clutter
Rag, for rubbing the stain
A can of spray clear coat, leftover from another project (bought a few too many)

I also used a paint respirator mask because fumes+human=bad things happen. I will not show you a picture of this, because the mask looks beyond silly on me...you can find these in most hardware or home improvement stores. I happen to have a few of them laying around, because we paint a lot of things around these here parts. 

Hint: Always test stain on a scrap piece of wood first — the color is hard to determine until applied to the wood you've chosen. Different color woods will look different with the same color stain. 

1. Wipe down your drawer and make any repairs needed. The nails were a little loose, so I gently tapped them back in with the edge of a flat carpenter's pencil. A tiny dab of super glue holds them tight.

2. Apply the stain to the wood using a circular motion, then wipe with the grain to get rid of any streaks.

Hint: a water-based stain will evaporate more quickly than will an oil-based one.
3. Allow stain to dry-this will depend on the type of stain you have chosen. Read the instructions on the can of stain you have chosen.  (I let mine dry overnight.)

4. Stains add color but don't protect wood, so some type of sealant must be used. Hint: I don't recommend that you use polyurethane, or lacquer, as it has a tendency yellow over time. I recommend a water-based finish sealant.


Right now I just have my spices tucked in the nooks in their usual bottles...I am in the process of collecting vintage spice jars to use instead! This is perfect in my Tuscan style kitchen! What do you guys think?

Creative Commons License
This work by Little Mom on the Prairie is licensed under a Creative Commons Attribution-NonCommercial-NoDerivs 3.0 Unported License.

Wednesday, April 18, 2012

Get Paid to Use Non-disposable Shopping Bags

Around 100 billion plastic bags are used in the US each year—that is a HUGE number!
In some countries you are actually charged per plastic bag that you use! Many countries have what’s called a PlasTax, such as Switzerland. Even IKEA and Aldi (in the United States) charges .05¢ - .15¢ per bag used!

Did you know that by using a re-usable grocery bag, you can save money? Some stores have put “green initiatives” in place to encourage shoppers to be more earth friendly.
At Target and Lowe’s Foods, you can get 5¢ per re-usable grocery bag off your total, but be sure to remind your cashier you have re-usable bags because there is a bar code they have to scan in order for your 5¢ to come off.
Whole Foods gives you .05¢-.10¢ off per re-usable bag! This varies by store so call ahead!
At CVS, you can purchase a Green Bag Tag (pictured below) for 99¢ and then every 4 times you scan your card, you earn $1.00 ECB. This can only be scanned once per day so even if you do multiple transactions at CVS in a day, you will only get credit for one Bag Tag scan per day. To participate, you must have a CVS ExtraCare Rewards card (free).
Many Trader Joe’s stores offer a .05¢ discount per re-usable bag. Again, check with your local store first! 
One of my readers in California reported some Trader Joe’s locations encourage customers to use their own bags by handing out raffle tickets to win a $25 Trader Joe’s gift card each time they use their own bag instead of disposables! Now that is incentive!
**If you know of a store that pays you to use Re-usable Grocery bags at their store, please leave a comment on this post letting us know the store and how much they pay!**

Creative Commons License
This work by Little Mom on the Prairie is licensed under a Creative Commons Attribution-NonCommercial-NoDerivs 3.0 Unported License.

Saturday, April 14, 2012

Nutella Lawsuit: Ferrero Settles Class-Action Suit Over Health Claims For $3 Million


A mother in California decided to sue Ferrero, maker of that famous chocolate-hazelnut spread Nutella,  after she realized the Nutella she'd been feeding her four-year-old daughter was "the next best thing to a candy bar." She'd been convinced the hazelnut-chocolate spread was healthy by ads and product labels that seemed to suggest it. Here is an excerpt from Nutella's 'Tips for Moms' section on their website, by a registered dietitian no less! 
"The "best" breakfast is the one that will be eaten! With the unique taste of Nutella®, kids may think they are eating a treat for breakfast, while moms are helping nourish their children with whole grains. A slice of whole wheat toast spread with Nutella®, a serving of fresh fruit and a cup of yogurt or 1% milk provides perfect balanced nutrition to start the day."
I personally think that the idea of having to trick children into eating healthy speaks volumes more about your parenting than the company that makes the food products you feed them.  I also think that it is your job as a parent to read the labels of what you feed to your children.
 That being said, the company puts a lot of emphasis on the skim milk, hazelnuts, or low sodium in their product, and neglects of course to mention the 5 teaspoons (21 g) of sugar. 
What do you think? Should parents be allowed to sue companies based on their marketing, if they neglected to read the label? I think we can all probably agree that we need more regulation on what food companies can say about their products. I don't think learning a little about what you eat before eating it is a bad idea, either. :) 
Delicious, in my opinion...but not the healthiest choice
If you live in California, and purchased Nutella between August 1, 2009 and January 23, 2012 you may be eligible to receive a payment from the settlement. Click HERE to find out more.

Creative Commons License
This work by Little Mom on the Prairie is licensed under a Creative Commons Attribution-NonCommercial-NoDerivs 3.0 Unported License.

Saturday, April 7, 2012

Sunny Yellow Side Table from Vintage Medicine Cabinet

Before I split Little Mom on the Prairie and Little Mom Saves Money into 2 separate blogs, this was one of the most popular posts on Little Mom Saves Money! This project won 2nd prize in the Spring Cleaning Contest on Instructables


This is one of my favorite projects that I have ever made. We found a perfect matched pair of vintage medicine cabinets in the basement of our investment house (aka the crap shack) basement. They have used razor slots in the back, and a delicate etching on the mirror front. I was amazed at the condition they were in (near perfect!) and immediately the vision of matching mirrored side tables popped into my head. I ended up exchanging my paint color 3 times before I was finally happy with this springy sunny yellow. It is a nice vintage type shade, and it looks better than I hoped it would!


Materials Used:
2 matching vintage mirrors from 1949
Wood Glue
1" trim head screws
1 3/4" wood screws
11 cans 'Sun Yellow' Rustolium Spray Paint
Spray Paint Application nozzle (highly recommended)
Fine grit and super fine grit sanding blocks
Paint & rust removal attachment, for power drill
18v power drill
3inch x 1inch x 8ft length of furniture grade cedar
8 table legs, stock from hardware store
6 cans clear water based spray sealant
protective gloves, eye wear and respirator mask, on hand from past projects


The slots in the back are razor blade slots. People would dispose of their used blades through the slot and into little "razor banks", or they would (like in our house) just dump them in between the walls. There was a big dangerous mess of rusty blades behind the lathe when we pulled down the interior walls of the house. 


There was some rust and paint that needed to be sanded off before we could prime and paint. 


We built a sturdy base for the medicine cabinet to sit in, so it won't tip. Also, to have something to properly attach the legs to, I thought it would topple over if we just bolted the legs to the cabinet. The mirror is very heavy. I could see it falling over if not for our handcrafted wood base!

For more in-depth details on how *MF* and I made these Sunny Yellow Side Tables, 

Creative Commons License
This work by Little Mom on the Prairie is licensed under a Creative Commons Attribution-NonCommercial-NoDerivs 3.0 Unported License.

Wednesday, April 4, 2012

Single Serve Curried Egg Salad


I am not as big of a fan of eggs as a lot of people I know, but I LOVE this recipe for curried egg salad so much, sometimes I eat it with a spoon, no bread required!


This recipe is for 1 serving, and is easily multiplied.

Ingredients:
1 hard boiled egg,peeled
1 1/2 Tbsp Mayo (I prefer miracle whip,use what you like)
1 stalk celery (optional) finely chopped
1/2 tsp curry powder
1/2 tsp mild mustard

1. Chop your eggs to your desired consistency. I like to have some big chunks in there, but you might like it in smaller pieces.
2. Add the mayo, curry powder, mustard and celery (if you chose to include it). Mix until well combined.
3. Refridgerate for 30 minutes before eating for best results. This gives the flavors time to meld and get all delicious.

This is great wrapped in lettuce for a healthy lunch, or on nice toasted bread.

Creative Commons License
This work by Little Mom on the Prairie is licensed under a Creative Commons Attribution-NonCommercial-NoDerivs 3.0 Unported License.